Alchemy Industrialization - Introduction to mlflow.
This is an automatically translated post by LLM. The original post is in Chinese. If you find any translation errors, please leave a comment to help me improve the translation. Thanks!
Dan medicine management is a crucial part of alchemy. After all, when batches of pills are produced through different materials and firing processes, we always have the following needs:
- Evaluate the effects of the pills and select the good ones
- Compare the effects of batches of pills to discover good material ratios (hyperparameters)
- Reproduce the production process of a pill with good effects
- ......

To meet these needs, we need alchemy management technology. In simple
terms, we need to establish mappings and alignments between
code, hyperparameters, and models
for storage, in order to support subsequent analysis and training
process tracing. As a result, many machine learning lifecycle management
software have been developed. This article mainly introduces an
open-source software called MLflow and its simple usage
process.
Installation
1 | pip install mlflow |
Management Panel
Start the management panel:
1 | mlflow ui --host=127.0.0.1 --port 8000 |
The structure of the management panel is simple, so you can explore it on your own.
Here, let's talk about the storage scheme for datasets. When running
the same experiment on multiple machines, the usual approach is to
download all the logs to one machine for comparison. This
manual management is cumbersome and error-prone. mlflow
adopts a client-server structure, so one machine can be
used as the server, and other machines can push data to the server by
accessing the uri when running experiments. Finally, the
data can be viewed and compared on the server.
One implementation approach is to deploy mlflow on a
server and open access to it:
1 | mlflow ui --host=0.0.0.0 --port 8000 |
Assuming the IP address of this machine is 192.168.1.12,
modify the uri on other machines accordingly:
1 | mlflow.set_tracking_uri(uri="http://192.168.1.12:8000") |
In addition, you can also add authentication:
1 | mlflow server --app-name basic-auth |
For more detailed information about authentication, see MLflow Authentication — MLflow 2.11.2 documentation
Introduction to MLflow Structure
MLflow is mainly divided into the following modules:
MLflow Tracking: Used to log experiment information, including parameters and metrics.
System Metrics: Records system status during program execution (CPU usage, memory usage, etc.).
MLflow Models: Saves trained models.
MLflow Model Registry: Manages registered models.
MLflow Projects: Manages projects by recording runtime environments and program entry points.
MLflow Plugins: Supports third-party plugins.
Instructions for Using MLflow
MLflow can support the entire lifecycle of a machine learning project, as shown in the following diagram:
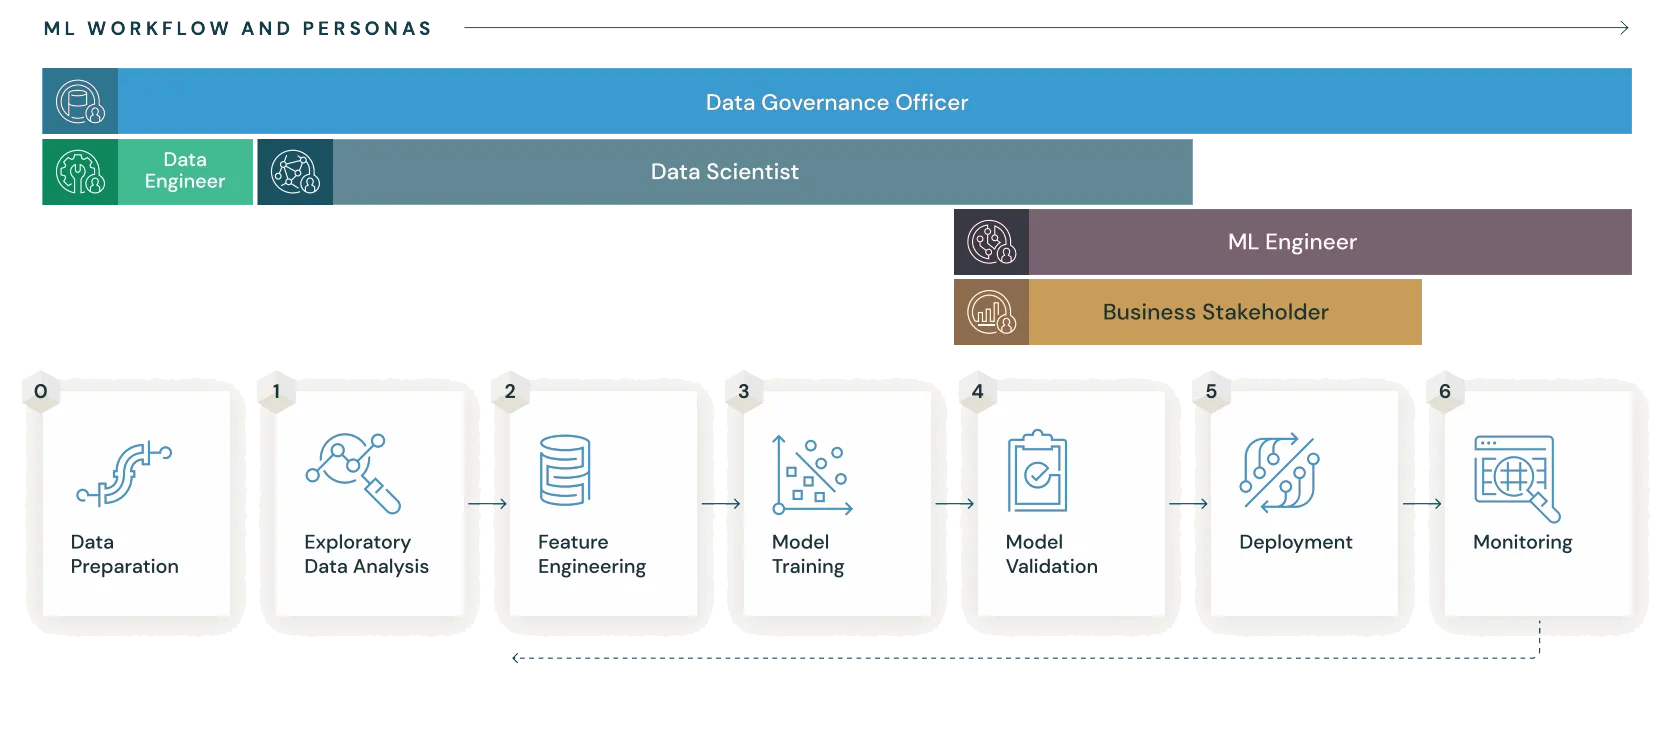 What is
MLflow? — MLflow 2.11.2 documentation
What is
MLflow? — MLflow 2.11.2 documentation
Next, we will introduce the usage of each part of MLflow
one by one.
MLflow Tracking
The main function of Tracking is similar to tensorboard,
which is to log hyperparameters and process data during training. Here
is an example:
1 | import mlflow |
Where:
mlflow.set_tracking_urispecifies the location wheremlflowdata is stored. If not specified, it defaults to the local folder.mlflow.set_experimentdefines the experiment name, which can be considered as corresponding to aproject. Different algorithm versions and different hyperparameter selections of the sameprojectshould use the same experiment name.mlflow.log_param: Logs a hyperparameter.mlflow.log_params: Logs multiple hyperparameters using a dictionary.mlflow.log_metric: Logs a process metric.mlflow.log_metrics: Logs multiple process metrics using a dictionary.
In addition, there are many other functions to achieve tasks such as
logging images, logging figures plotted with matplotlib,
and logging files. Here, we won't list them one by one. You can refer to
the official documentation: mlflow
— MLflow 2.11.2 documentation
Auto Logging
In addition, MLflow also supports automatic tracking of
process data. Here is an example:
1 | import mlflow |
I haven't tried automatic tracking yet, so here is an illustration from the official documentation:
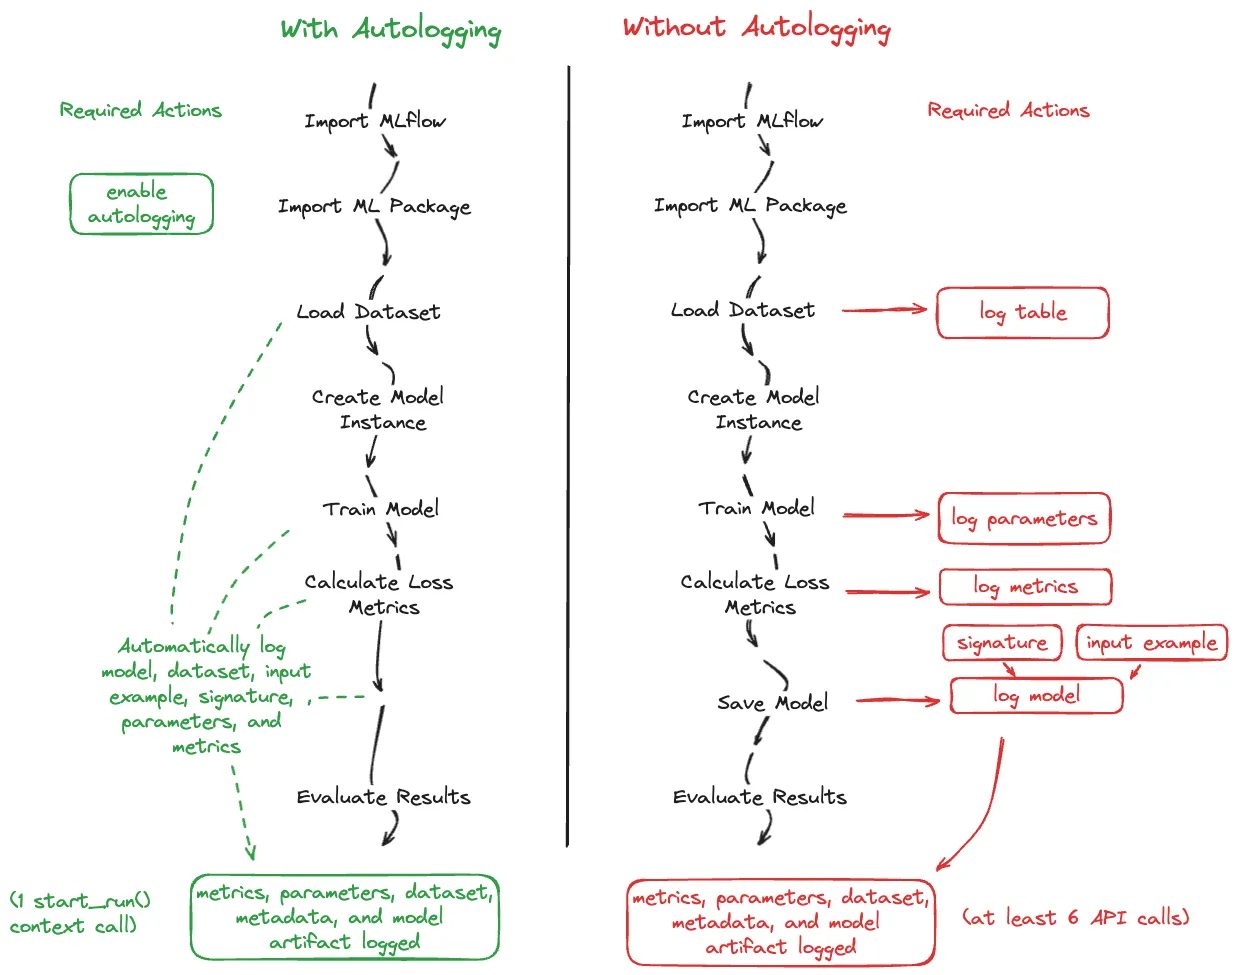
Getting Started with MLflow — MLflow 2.11.2 documentation
For further information on Auto Logging, refer to: Automatic Logging with MLflow Tracking — MLflow 2.11.2 documentation
System Metrics
The System Metrics module is used to monitor various system status indicators during the training process. Here is an example:
1 | import mlflow |
System monitoring is not enabled by default. Execute the above code to enable it if you want to record system metrics.
MLflow Models
The MLflow Models module is mainly used to store models trained by
code. It has different implementations for different deep learning
libraries. Taking pytorch as an example:
1 | import numpy as np |
For more details, see: MLflow Models — MLflow 2.11.2 documentation
MLflow Model Registry
The Model Registry is used to version control the models produced in production. It can be operated on the UI panel. For the specific process, see MLflow Model Registry — MLflow 2.11.2 documentation
MLflow Projects
MLflow Projects records the runtime environment and program entry points through a configuration file, making it easy to distribute programs.
It mainly consists of three parts:
- Name: Project name
- Entry Points: Program entry points, which can take parameters and can be used to compose pipelines with multiple entry points
- Environment: Runtime environment configuration, supporting
conda,Vitrualenv, andDocker
Create an MLproject file in the root directory of the
project and write the configuration, for example:
1 | name: My Project |
After creating the configuration file, you can use
mlflow to run it automatically:
1 | mlflow run /path/to/project --env-manager=conda |
In addition, you can also specify a Github repository to
run the project:
1 | mlflow run git@github.com:mlflow/mlflow-example.git -P alpha=0.5 |
For more information about mlflow run, use
mlflow run --help to view it.
For more detailed information about MLflow Project, see
MLflow
Projects — MLflow 2.11.2 documentation
MLflow Plugins
MLflow is an open-source project and supports various plugins. You can also develop your own plugins to meet your personalized needs. For information about plugin development, installation, and popular plugins in the community, see MLflow Plugins — MLflow 2.11.2 documentation