Next标签云配置
This is an automatically translated post by LLM. The original post is in Chinese. If you find any translation errors, please leave a comment to help me improve the translation. Thanks!
This article is from Next 7.0+ TagCanvas Tag Cloud | Alex_McAvoy (alex-mcavoy.github.io)
Next 7.0+ allows for custom settings for tags. On this basis, the
tagcanvas.js plugin for spherical tag clouds can be used
for style modification. The specific modification steps are as
follows:
Download the plugin
For a detailed introduction to the spherical tag cloud
tagcanvas.jsplugin, click here.After downloading the plugin, place it in the
/theme/next/source/jsdirectory.Create a tag cloud swig file
In the
/theme/next/layout/_partialsdirectory, create a file namedtagcanvas.swigand write the following content:1
2
3
4
5
6
7
8
9
10
11
12
13
14
15
16
17
18
19
20
21
22
23
24
25
26
27
28
29
30
31
32
33
34
35
36
37<div class="tags" id="myTags">
<canvas width="500" height="500" id="my3DTags">
<p>Anything in here will be replaced on browsers that support the canvas element</p>
</canvas>
</div>
<div class="tags" id="tags">
<ul style="display: none">
{{ tagcloud({
min_font : theme.tagcloud.min,
max_font : theme.tagcloud.max,
amount : theme.tagcloud.amount,
color : true,
start_color: theme.tagcloud.start,
end_color : theme.tagcloud.end})
}}
</ul>
</div>
<script type="text/javascript" src="/js/tagcanvas.js"></script>
<script type="text/javascript" >
window.onload = function() {
try {
TagCanvas.Start('my3DTags','tags',{
textFont: 'Georgia,Optima',
textColour: null,
outlineColour: 'black',
weight: true,
reverse: true,
depth: 0.8,
maxSpeed: 0.05,
bgRadius: 1,
freezeDecel: true
});
} catch(e) {
document.getElementById('myTags').style.display = 'none';
}
};
</script>Modify the page configuration file
Modify the
/theme/next/layout/page.swigfile as shown in the figure below: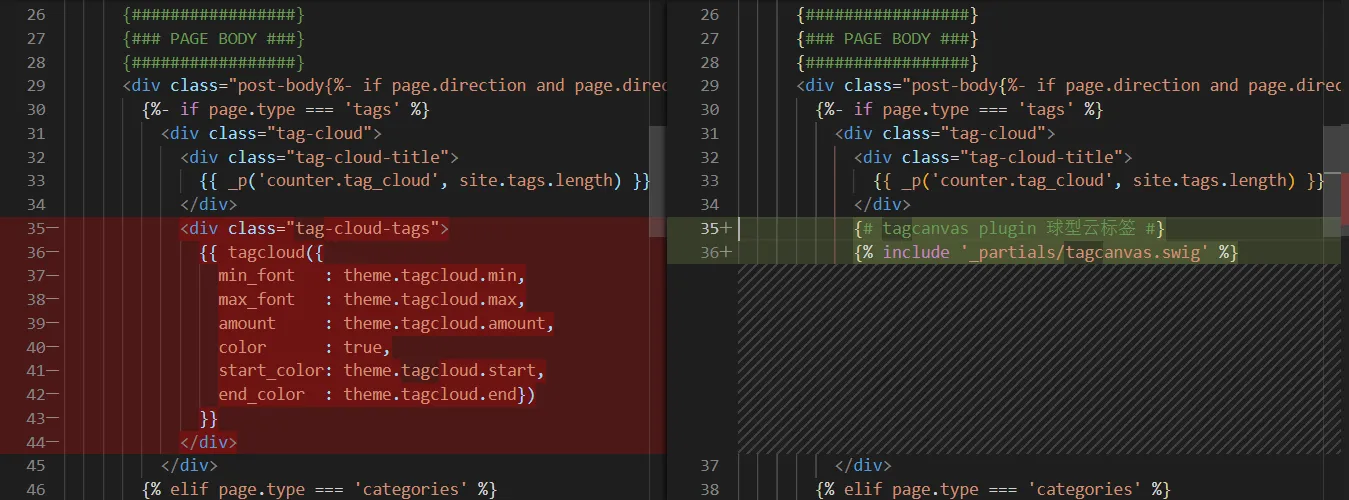
Add the following code:
1
2
{# tagcanvas plugin spherical tag cloud #}
{% include '_partials/tagcanvas.swig' %}Modify the theme configuration file
Open
/theme/config.ymland find thetagcloudfield. Modify it according to your actual needs:1
2
3
4
5
6
7
8# TagCloud settings for tags page.
tagcloud:
# All values below are same as default, change them by yourself.
min: 20 # Minimun font size in px
max: 30 # Maxium font size in px
start: "#19CAAD" # Start color (hex, rgba, hsla or color keywords)
end: "#F4606C" # End color (hex, rgba, hsla or color keywords)
amount: 200 # Amount of tags, change it if you have more than 200 tags